Networking
ShowPro can operate as a stand alone program where a single computer will be used to do the entire show or it can operate as either a host or a client in a network of computers. In a networked situation there will always be one host computer, usually the head secretary's, and one or more client computers that will either be ShowPro clients or ShowPro Exhibitors Terminal (Kiosk) clients. Important Points Wireless networking although fine for web browsing is inappropriate for networking ShowPro. We do not recommend it - data loss could result - don't do it. It is also less than half the speed of a wired network which is in itself sufficient reason to avoid it never mind the potential data loss. On the host computer you must share the files and make sure that Windows networking is configured correctly but never set a network path on the host - the host operates in local mode. On the clients you must set the network path but never on the host which knows how to find the data without any help. Never try and set a network path on a new networking configuration before you have established that you can navigate to the files through Windows. If you can get there through Windows you will be able to get there with ShowPro. If there is something preventing you from getting there Windows has better diagnostics - ShowPro will simply display a failure message that will not be very helpful. If you have a fire wall on your host computer (you probably do, you may even have two) disable it until you get the networking functioning. A fire wall will stop your networking dead in its tracks and Windows will not tell you that it is the fire wall that is the problem. Once your networking is functioning there are ways to allow ShowPro through the fire wall that vary from one firewall to another and are beyond the scope of this guide. If you are not connected to the Internet you can leave the firewall disabled. If you have followed all the instructions in this guide and are still unable to network the odds are quite good that it is a firewall that is blocking you. When you connect to a new network Windows is going to ask you if it is a Public or Private (Home or Work) network, always select Private/Home/Work. When you're networking ShowPro you're using a Private network, if you select Public Windows may impose restrictions that are unnecessary and unhelpful. Required Equipment To network two computers together requires, at a minimum, what is called a network crossover cable. These cables are easy to obtain and are available in lengths from six foot to 25 foot, or longer. Simply connect the network ports of the two computers with this cable. You cannot use a standard patch cable to directly connect two computers, it must be a crossover cable which incidentally has two of it's wires crossed, this is what enables the direct connection. To connect more than two computers together requires a switch or router, and standard networking patch cables. Connect the network port of each computer to a port on the switch or router. |
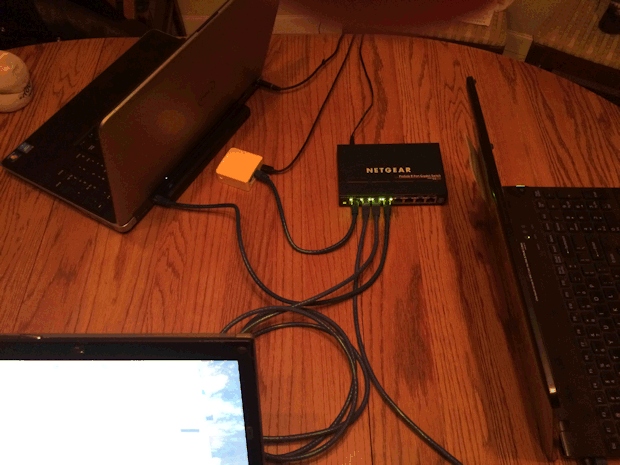
Note: Even if you are only connecting two computers together you may want to get an inexpensive router. Routers enable you to use dynamic IP addresses which simplify your IP setup and allow you to use the same IP setup that you probably need to connect to the internet at home. Otherwise you will probably have to switch to dynamic IP addresses at home anyway to connect to the internet. You should use your most powerful system as the host computer, you will obviously get better performance. Gigabit networking components are now available at reasonable prices and provide a substantial increase in performance, if you will be connecting more than a few computers you should look into Gigabit switches or routers, cables, and adapters. Be aware that some editions of Windows limit the number of computers that can be connected to them. XP Home will only allow five connections for example. The Professional editions allow unlimited connections although Windows networking itself has a practical limitation that depends on the speed of your computers and your networking equipment. Recommended Equipment Search on Amazon for "GL-iNet-GL-MT300N-V2", it should come up with an amazing yellow miniature router for about $20. First of all, it's a router, it will enable you to use dynamic IP addresses. But it will also solve any internet connectivity problem no matter what your circumstances. It can connect to available WI-FI and provide wired internet to all your connected computers. If you have a wire coming from the facilities router you can plug it into this router and you'll have your own isolated network with internet. Lastly you can plug a phone or other cellular device into the routers USB port, this is called "tethering", and provide wired internet to all the computers on your network. There are other brands of these travel routers available on Amazon, if you can't find the one mentioned above the critical thing is to find one that supports WISP mode, this is the mode that allows the router to connect to an internet source and provide the internet over the wire to your computers. Don't purchase anything unless it specifically supports WISP mode. Tp-Link is another brand we've used successfully. The mini router only has one port so you'll need a switch, a switch connected to a router becomes an extension of that router. We recommend NetGear Gigabit switches, search on amazon for "NetGear Gigabit Switch", they are available with 5, 8, or more ports for as little as $20. You'll also need Cat5e or Cat6 network patch cables, one for each device you'll be connecting. Below, 3 computers are connected to a NetGear 8 port Gigabit switch which is connected to a GL-iNet-GL-MT300N-V2 mini router. The router is connected to the WI-FI and all 3 computers are receiving internet through the wire. |
The Workgroup All computers on your network must be set to the same Workgroup, if you are not sure that they are you need to check them and set them if they are different. ▪Right click on Computer and select Properties. ▪On the left click on Advanced System Settings ▪Click on the Computer Name Tab. ▪The workgroup name will be displayed there, check this on all computers and make sure the names agree. ▪If they don't agree decide on a name, WORKGROUP is the default and recommended. ▪Click the Change button and edit the workgroup names of those computers that don't agree. You'll have to restart any computers that you change the work group name on. Sharing The Files On The Host In order to use Windows® peer to peer networking with ShowPro you must first share the folder on the host computer where the files reside that you intend to use. The folder that you should share is the ShowPro folder which is in C:\Users > Public > Public Documents. ▪On the host computer go to C:\Users > Public > Public Documents ▪Right click on the ShowPro folder and select Properties from the pop up menu. ▪Click on the Sharing Tab. ▪Click the Advanced Sharing button. ▪Check the Share this folder box. ▪Windows will probably set the share name to ShowPro. ▪Click the Permissions button ▪With the Everyone Group selected check the Allow box for Full Control ▪Click Ok Only the above described folder needs to be shared, sharing other folders, the "My ShowPro Files" folder for example will only cause potential confusion. IP Addresses If you have a router anywhere on your network you can use dynamic IP (Internet Protocol) addresses, if you only have a switch you must use static IP addresses. ▪In This PC or Computer Right click on Network down low on the left and select Properties. ▪Up high on the left click on "Change Adapter Settings". ▪Right click on Local Area Connection or Ethernet and select Properties. ▪Left click on Internet Protocol Version 4 (TCP/IPv4) - just select it, don't uncheck the box. ▪If you have a router on your network select "Obtain and IP address automatically" if it isn't already selected. ▪If you only have a switch follow the directions below for setting a static IP address. ▪Click Ok. |
Setting a Static IP Address if You Don't Have a Router IP addresses consist of 4 numbers separated by dots. The IP address of each computer must be unique on the network but it must also conform to a particular protocol. Set your IP addresses like this... Host: 192.168.0.1, Client #1: 192.168.0.2, Client #2: 192.168.0.3, Client #4: 192.168.0.4, etc. Notice that the addresses are the same except for the last segment which increases with each computer. After typing in the IP address, paying careful attention to where the dots are, click in the empty Subnet mask box, it will be filled in automatically for you. |
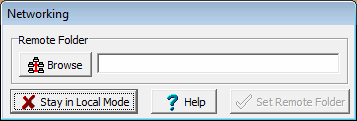
Advanced Sharing Settings In This PC or Computer right click on Network down low on the left and select Properties. Up high on the left click on "Change advanced sharing settings". For the Private profile (or Home or Work) check the following settings... ▪Turn on network discovery ▪Turn on file and printer sharing On Windows 8/10 the rest are under "All Networks" ▪Turn on public folder sharing ▪Use 128-bit encryption ▪Turn off password protected sharing Set the above settings on all the computers on your network. Setting The Network Path In ShowPro First and foremost establish that you can get to the files through Windows networking, if you can't get there through Windows you'll never get there through ShowPro. In This PC or Computer left click on Network down low on the left, you should see all the computers that are on your network listed at the top on the right. They must be listed under "Computers", "Media Devices" of no use for networking. If your computers are not showing up see the "What if My Computers Are Not Showing Up" at the bottom of this section. In a ShowPro client, on the Start Screen, click on Networking, the following dialog box will be displayed... |
|||
|
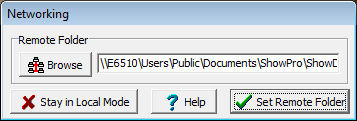
The dialog is indicating that you are in local mode, notice the remote folder is blank and the button says "Stay in Local Mode". This is how it should look on the Host computer. Click the Browse button to set a Remote Folder on a client computer. |
||
|
If you are an advanced user you can also just type in the path to the remote folder.
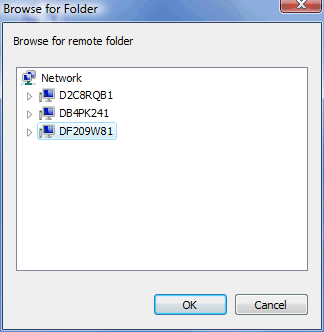
Select the computer that is your host computer on the network. If you don't know which computer is your host see the discussion above about Workgroups, your computers name is displayed in the same place as the Workgroup.
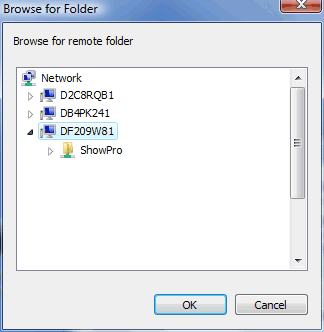
Double click on the hosts computer name to expand the tree.... |
||
|
Now double click on the ShowPro Share to expand it. |
||
|
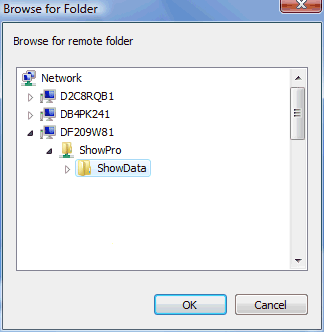
Now select the ShowData folder which is the folder that contains the database files. It may not be quite so straight forward as is displayed to the left, you may have to browse through Users > Public > Public Documents > ShowPro to get to the ShowData folder Click Ok. |
||
|
The networking dialog now indicates that the client will point at the hosts ShowData folder. Click the Set Remote Folder button to complete the networking of the client computer. |
||
What if My Computers Are not Showing Up?
Windows updates on at least one occasion have screwed up Windows networking settings causing network discovery to not function properly. Follow the steps below to fix this if your network computers are not being displayed when you left click on Network, or are being displayed only as "media devices" and not as computers. These steps came from an article referring to a Windows 10 update breaking Windows networking but I recently had this problem on a Windows 7 computer and successfully used the steps below to fix it. 1.Hit the Windows key + R to get a command prompt, type in services.msc and press Enter. 2. In the Services window look for the following services: DNS Client Function Discovery Provider Host Function Discovery Resource Publication Peer Networking Grouping HomeGroup Provider HomeGroup Listener SSDP Discovery UPnP Device Host 3. Go through each that appears in your services double clicking to open it, and set Start to Automatic if it isn't already, then Apply and OK. Next right click on the same item and tell it to Start if it's not running or Restart if it is running. |
Coexisting Wired and Wireless Networks
If you're not getting internet through a router, i.e. you're using a switch or a crossover cable, and you have WI-FI available for internet, Windows may ignore your wired network and give preference to the wireless network, this can result in a frustrating situation where you've followed the steps above and it's just not working. Doing the following should resolve this problem forever... 1.In This PC or Computer right click on Network down low on the left and select Properties. 2.Up high on the left click on "Change adapter settings". 3.Right click on Ethernet or Local Area Connection and select Properties. 4.Click on "Internet Protocol Version 4 (TCP/IPv4)" and then click the Properties button. 5.Click the Advanced button. 6.Uncheck the Automatic metric check box. 7.Enter "1" in the Interface metric box. 8.Follow the same steps for the Wireless Connection except enter "2" in the Interface metric box. |
